Visual Paradigm Installation and User's Guide: Difference between revisions
From KKM-STUDIO-WIKI
More actions
No edit summary |
No edit summary |
||
| Line 4: | Line 4: | ||
*Contact Shuokai Ma ([mailto:s214919@student.dtu.dk s214919@student.dtu.dk]) if you find a problem or have suggestions for this Wiki. | *Contact Shuokai Ma ([mailto:s214919@student.dtu.dk s214919@student.dtu.dk]) if you find a problem or have suggestions for this Wiki. | ||
= Download, Install And Activate Visual Paradigm = | = Visual Paradigm Installation = | ||
== Download, Install And Activate Visual Paradigm == | |||
#Download the latest version of [https://www.visual-paradigm.com/download/ Visual Paradigm], and then install the Visual Paradigm by following the instructions of the installation wizard. | #Download the latest version of [https://www.visual-paradigm.com/download/ Visual Paradigm], and then install the Visual Paradigm by following the instructions of the installation wizard. | ||
| Line 16: | Line 17: | ||
#Click '''OK '''to confirm. <span class="notranslate">Visual Paradigm </span>will be activated if the verification code is valid. | #Click '''OK '''to confirm. <span class="notranslate">Visual Paradigm </span>will be activated if the verification code is valid. | ||
= | = Visual Paradigm User's Guide = | ||
== Create your first project in Visual Paradigm == | |||
To create a project, select '''Project -> New''' from the toolbar.[[File:Create a new project 33403.png|300px|center|frame|Create a new project]] | |||
The '''New Project''' window appears.[[File:An overview of new project window 33404.png|500px|center|frame|An overview of New Project window]] | |||
{| class="wikitable" style="border-collapse: collapse; width: 100%; height: 184px;" | |||
|- style="height: 23px;" | |||
| style="width: 7.59245%; height: 23px; text-align: center;" | '''No.''' | |||
| style="width: 22.3256%; height: 23px; text-align: center;" | '''Name''' | |||
| style="width: 70.0818%; height: 23px; text-align: center;" | '''Description''' | |||
|- style="height: 23px;" | |||
| style="width: 7.59245%; height: 23px; text-align: center;" | 1 | |||
| style="width: 22.3256%; height: 23px;" | Name | |||
| style="width: 70.0818%; height: 23px;" | The name of the project. | |||
|- style="height: 23px;" | |||
| style="width: 7.59245%; height: 23px; text-align: center;" | 2 | |||
| style="width: 22.3256%; height: 23px;" | Author | |||
| style="width: 70.0818%; height: 23px;" | The person who creates the project. | |||
|- style="height: 23px;" | |||
| style="width: 7.59245%; height: 23px; text-align: center;" | 3 | |||
| style="width: 22.3256%; height: 23px;" | Data type set | |||
| style="width: 70.0818%; height: 23px;" | It lets you select the programming/scripting language for the project. The language you selected mainly affects class modelling. For example, the selectable visibilities and primitive types vary among languages. | |||
|- style="height: 23px;" | |||
| style="width: 7.59245%; height: 23px; text-align: center;" | 4 | |||
| style="width: 22.3256%; height: 23px;" | Description | |||
| style="width: 70.0818%; height: 23px;" | The project description. | |||
|- style="height: 23px;" | |||
| style="width: 7.59245%; height: 23px; text-align: center;" | 5 | |||
| style="width: 22.3256%; height: 23px;" | Create Project Management Lookup | |||
| style="width: 70.0818%; height: 23px;" | Check it to automatically fill the project management lookups such as iteration, version, etc with default lookup values. | |||
|- style="height: 23px;" | |||
| style="width: 7.59245%; height: 23px; text-align: center;" | 6 | |||
| style="width: 22.3256%; height: 23px;" | Create Blank Project | |||
| style="width: 70.0818%; height: 23px;" | Click to create the project. | |||
|- style="height: 23px;" | |||
| style="width: 7.59245%; height: 23px; text-align: center;" | 7 | |||
| style="width: 22.3256%; height: 23px;" | Cancel | |||
| style="width: 70.0818%; height: 23px;" | Click to cancel creating the project, and close the window. | |||
|} | |||
Enter the name of the project and your name. And then you should choose '''UML''' as the Data type set and click '''Create Blank Project'''. | |||
== UML modelling == | |||
Revision as of 20:48, 9 February 2023
READ ME FIRST
- This tutorial only applies to the WINDOWS operating system, other operating systems have not yet been verified.
- This tutorial is based on this website to make additions and changes.
- Contact Shuokai Ma (s214919@student.dtu.dk) if you find a problem or have suggestions for this Wiki.
Visual Paradigm Installation
Download, Install And Activate Visual Paradigm
- Download the latest version of Visual Paradigm, and then install the Visual Paradigm by following the instructions of the installation wizard.
- Start Visual Paradigm. When you see the following screen, select Subscription/Academic License.
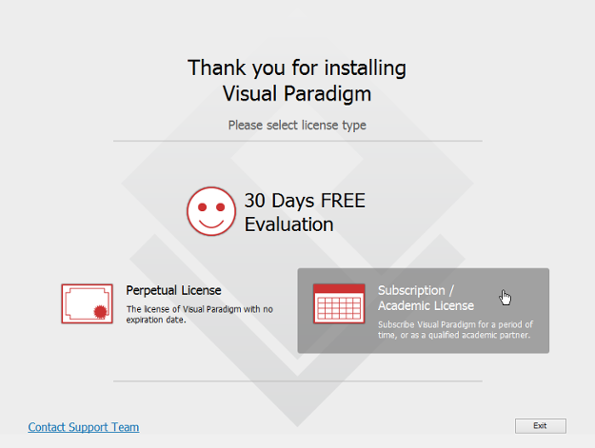
Select Subscription / Academic License - Expand Academic 'Training Partner Program License'.
- Copy the activation code from DTU Learn (Under Content -> UML Modelling Tools -> Visual Paradigm Academic License).
- Paste the activation code to the textbox called Activation Code. And then enter your name and email address.
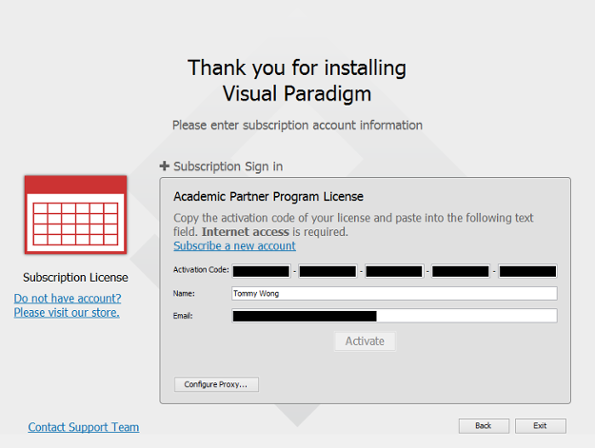
Activating Visual Paradigm - Click Activate. You are prompted for an activation code.
- Go to your email inbox and Check your new email for the verification code.
- Copy the verification code and paste it to Visual Paradigm.
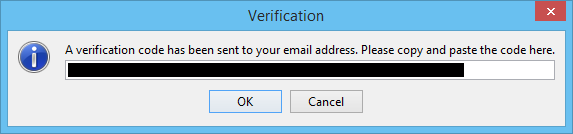
Pasting the verification code - Click OK to confirm. Visual Paradigm will be activated if the verification code is valid.


Visual Paradigm User's Guide
Create your first project in Visual Paradigm
To create a project, select Project -> New from the toolbar.

The New Project window appears.

| No. | Name | Description |
| 1 | Name | The name of the project. |
| 2 | Author | The person who creates the project. |
| 3 | Data type set | It lets you select the programming/scripting language for the project. The language you selected mainly affects class modelling. For example, the selectable visibilities and primitive types vary among languages. |
| 4 | Description | The project description. |
| 5 | Create Project Management Lookup | Check it to automatically fill the project management lookups such as iteration, version, etc with default lookup values. |
| 6 | Create Blank Project | Click to create the project. |
| 7 | Cancel | Click to cancel creating the project, and close the window. |
Enter the name of the project and your name. And then you should choose UML as the Data type set and click Create Blank Project.